


Mads and Ava from Sail Life are back with another update on their 44 ft hurricane-damaged DIY catamaran project, Spiffy. In previous posts, we’ve seen them tackle complex challenges like vacuum infusion with High Performance Epoxy for tram ramp hatches and the meticulous keel rebuild using Epoxy and TotalFair Epoxy Fairing Compound. More recently, Mads installed floors and coated engine compartments with TotalBoat TotalBilge. This week, he’s opening the doors to his new shipping container workshop for a practical build and a hands-on product test.
Building a “Spiffy” Collapsible Workshop Table
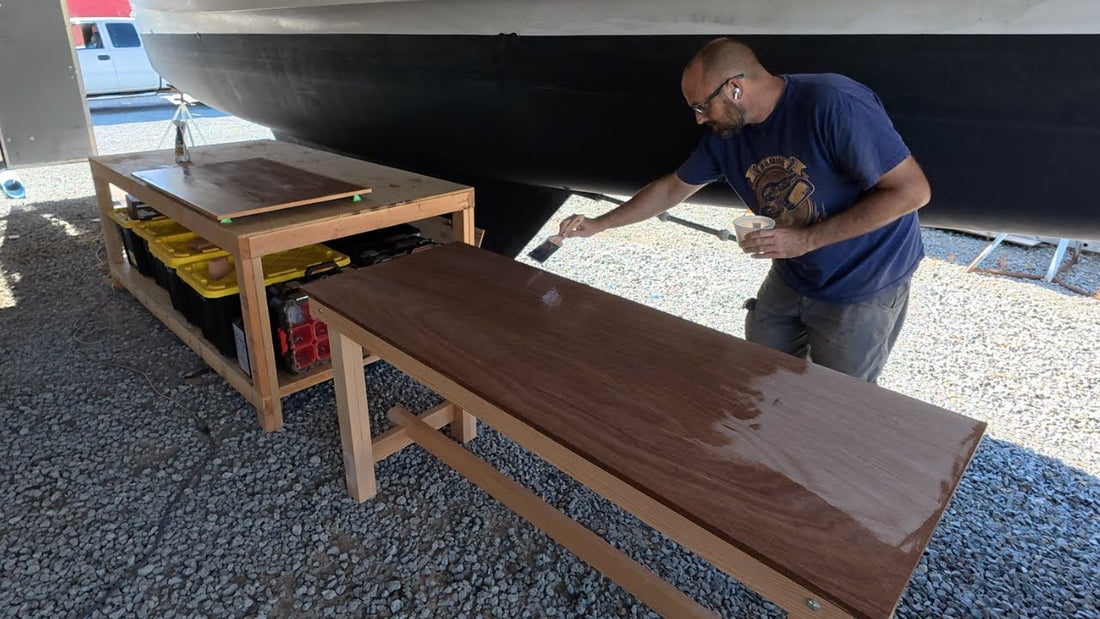
With his miter saw tuned up from last week, Mads set out to create a collapsible workshop table for the container. Using a Fusion model for precise dimensions, he crafted rounded-leg tops for smooth pivoting and bonded the legs and plywood tabletop for strength and durability. This project not only delivered a functional workspace but also set the stage for the finer joinery work ahead, like the cherry trim destined for Spiffy’s interior.
Below: Mads using thickened epoxy to adhere the table top to the base.

Introducing a New Wood Finish: TotalBoat Halcyon
The highlight of this episode was Mads’s first test with TotalBoat Halcyon Water-Based Marine Varnish. Planning to use it on the boat’s interior in the future, he wanted to see how it performed.


Before brushing on the first coat, Mads reminded viewers about a key detail from the Technical Data Sheet: for a satin finish, start with gloss coats before topping with satin. He applied five coats of Halcyon Clear Gloss and mentions how he appreciated its easy application and simple soap-and-water cleanup. After 48 hours and a light sanding, he added a final satin topcoat. While he noted some light brush marks, he suspects more practice, or slight thinning will improve the result.
The test also revealed how a clear finish makes surface imperfections, like last week’s epoxy fill, more noticeable compared to an amber gloss. Overall, the trial was a valuable durability check before committing Halcyon to Spiffy’s interior woodwork.
Below: Mads mentions that it is helpful to have a light source off to the side to spot any dry spots as you apply a varnish.

Below: The finished table top, with one coat of Halcyon Satin as the final coat.

Beyond the Workshop: Repairs and Big News
While waiting for delayed windows for the workshop, Mads jumped in to help a colleague repair a powerboat exhaust box. Using fiberglass layup with thickened epoxy, he executed a solid fix. On the catamaran side, he received an $8,000 new steering system, an investment made possible by his patrons and sponsors.
And in a more personal update, Mads and Ava shared that they were in Orlando for their marriage-based green card interview—fingers crossed for them!
What’s Next
Next week, Mads plans to install those long-awaited workshop windows and begin framing the shipping container. Stay tuned to Sail Life for more DIY ingenuity and Spiffy’s steady transformation.


Clear High Performance Epoxy Kits


Halcyon Water-Based Marine Varnish


Plastic Paint Pails and Epoxy Mixing Cups


2 comments
I am curious if using a foam applicator or a paint pad would help eliminate the minor brush marks? I will be using Halcyon amber gloss with a final coat of Halcyon satin on a table top using this method shortly. I will try to leave an additional comment with the outcome.
My experience with Halcyon is that there are always some brush marks remaining. It’s the tradeoff for the convenience and the fast re-coat time. It’s not going to be as smooth as an oil-based finish.